AI Smart Binding
As an OT engineer or system integrator, you may often face scenarios like these:
-
Tight project timelines with customers pushing for delivery. You just used AI to generate a beautiful monitoring page, only to realize that you now need to spend hours manually searching for variables and binding data points—undermining the promise of "rapid development."
-
Complex equipment – a hydraulic press monitoring page might contain dozens of data points (temperature, pressure, flow...), and your project may have hundreds or even thousands of variables. How do you quickly and accurately find that "temperature sensor 01" among a sea of variables? Manual searching? Excel lookup tables? These methods are inefficient and error‑prone.
-
Repetitive work is exhausting – "Main Cylinder Top Stop" on Machine A and "Main Cylinder Top Stop" on Machine B are essentially the same type of parameter. Why should you repeat the same binding operation over and over? That time could be used to optimize process logic or solve your customers’ core problems.
The essence of the pain point:
AI helps you generate the page, but the page is only a static graphical interface. Turning a static page into a usable system that runs on the real production line and displays live data still requires a significant amount of time and effort for "variable binding."
AI Smart Binding
Now this challenge is solved. AI Smart Binding is an important feature that enables AI not only to "draw" but also to "wire." From now on, your workflow evolves from "generate → manually bind → usable" to "generate → AI intelligent matching → one‑click confirm → usable."
In one sentence:
The AI automatically understands the meaning of every component on your generated page, intelligently searches , precisely matches within the device channels you specify, and recommends the most suitable variables to bind. The whole process is fast and accurate.
Three Core Highlights
1. True "Intelligent Understanding"
The AI does not simply match by name; it truly understands the context:
- When the page title is "Hydraulic Press Main Unit 1 Monitoring", the AI prioritises searching within channels related to "hydraulic press".
- When a component is a numeric display showing "Temperature", the AI automatically filters out all non‑temperature variables.
- After you set the device channel scope, the AI will only search within that reasonable range to find the best match.
2. Dramatic Efficiency Improvement
Let the data speak for itself:
| Work Scenario | Traditional Manual Binding | AI Smart Binding | Efficiency Improvement |
|---|---|---|---|
| Simple monitoring page (20 components) | ~2 hours | < 5 minutes | 96% improvement |
| Complex dashboard (50+ components) | ~6 hours | < 10 minutes | 97% improvement |
| Multi‑device aggregate page (100+ components) | 1-2 days | < 20 minutes | 98% improvement |
What does this mean?
- A project that would originally take 3 days can now be delivered in 1 day.
- You can use the time saved to optimise logic, test the system, or serve more customers.
3. Complete Controllability and Transparency
We know that any mistake on an industrial site can have serious consequences. Therefore, the AI's role is "advisor", not "dictator":
- Review mechanism: After the AI completes the matching, all recommendations are shown as a list for you to review item by item.
- Flexible modification: Not satisfied with a recommendation? You can uncheck it or manually modify it in the list.
- Second confirmation: Changes take effect only after you click "Apply Binding".
Throughout the process, the decision power always stays in your hands.
Operation Steps
Step 1: Generate the Page
Describe your requirements in natural language, and the AI generates a monitoring page for you.
Example: "Create a hydraulic press monitoring page with 4 main units. Each unit shows temperature, current, production count, and efficiency."
After the page is generated, move to the next step.
Step 2: Start Smart Binding
Click on the page smart assistant dialog window, then click the "+" button at the bottom, you will see the Smart Binding button.
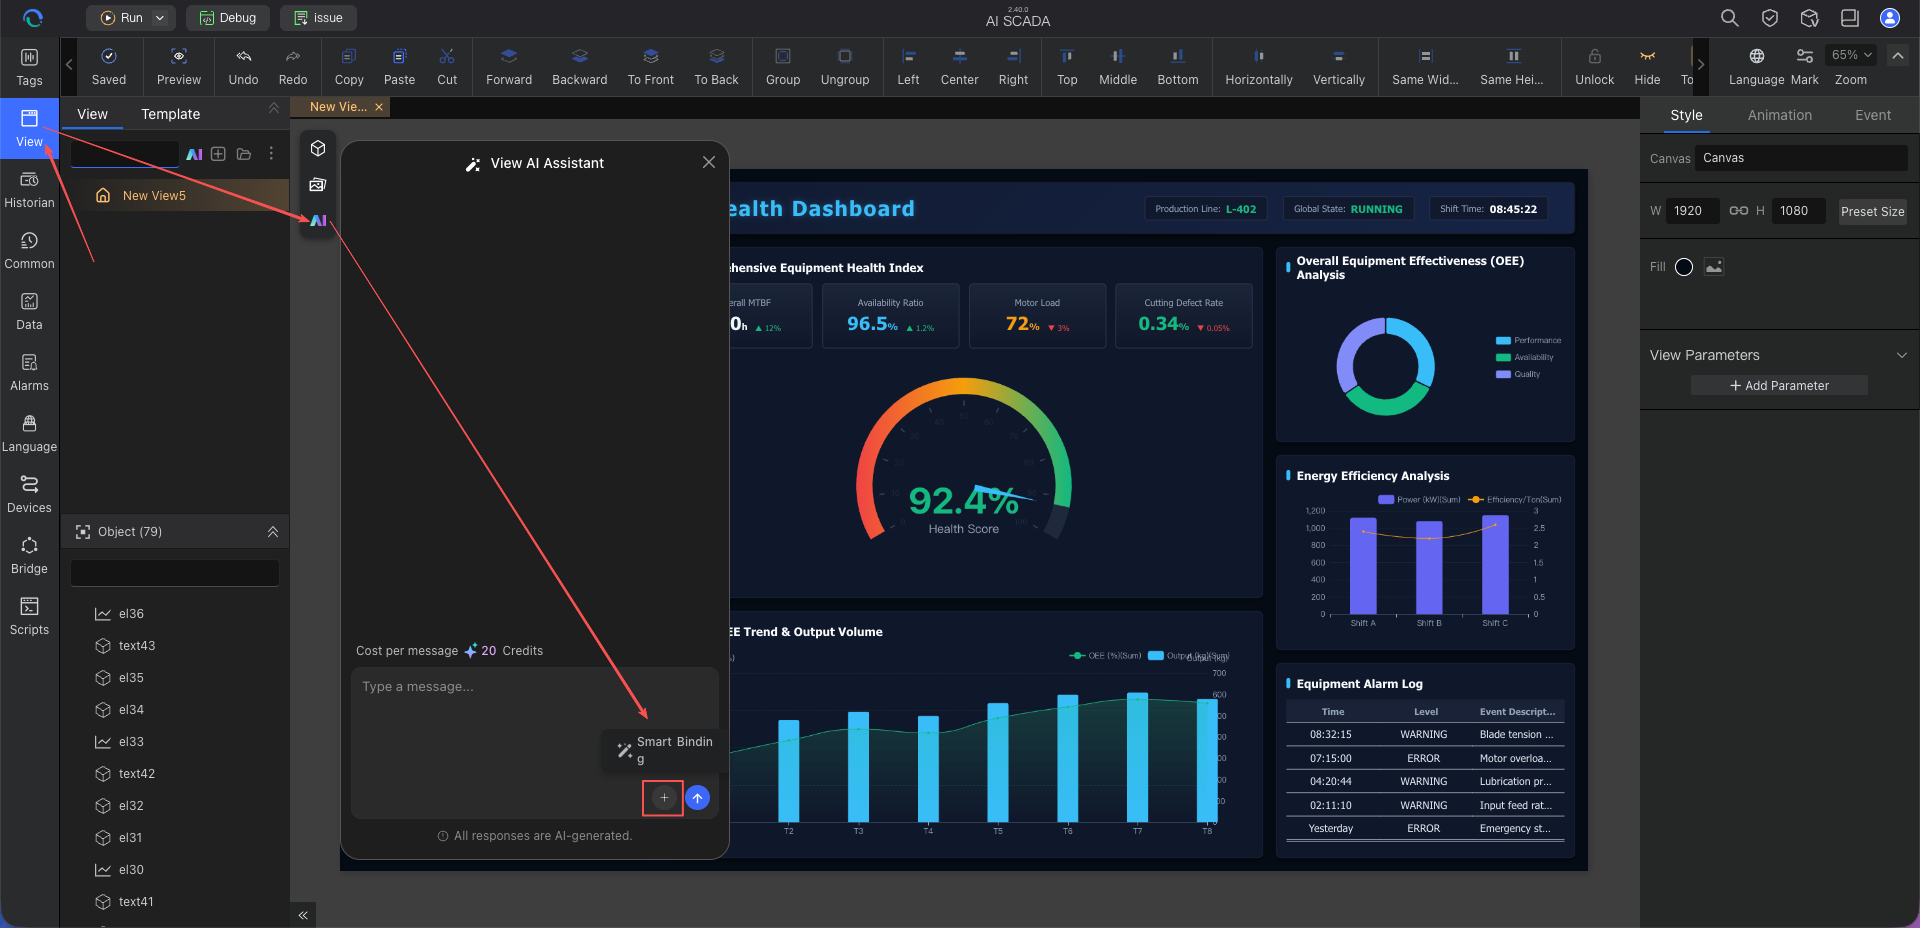
Click it to enter the binding flow.
Step 3: Select the Data Scope and Let the AI Work
A window will pop up with the title: "Select Variable Scope"

- What do you need to do? In the tree‑structured device channel list, check one or more channels. For example, check "Hydraulic Press – Main Unit 1", "Hydraulic Press – Main Unit 2".
- Why select a scope? This allows the AI to search within the correct range, preventing it from mistakenly matching "boiler temperature" to "hydraulic press temperature". The more precise the scope, the more accurate the matching.
- Hint: If your project variables are well managed and channel names are clear, this step will be very quick.
After selecting, click the 【Start Analysis】 button.
Step 4: Review the AI's Suggestions
The AI will finish the analysis in a few seconds to a dozen seconds, and a new window will pop up with the title: "Smart Binding Suggestions"
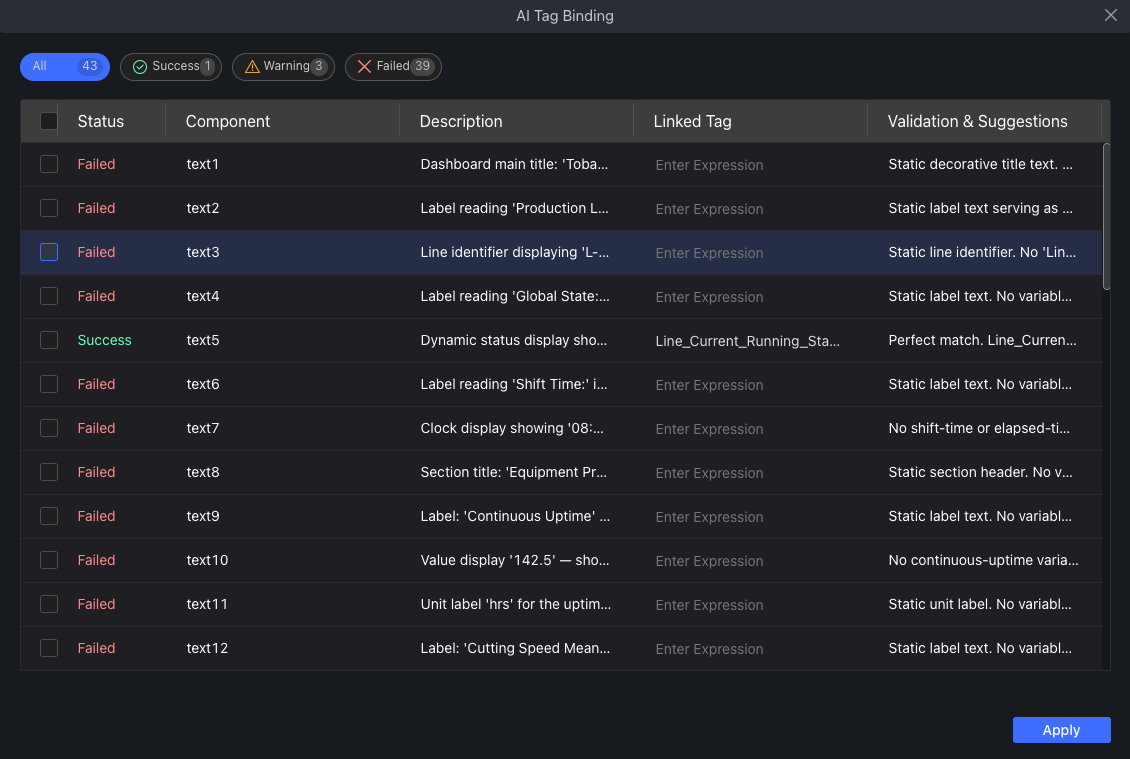
The window shows a list. Each row contains:
- Component Name (e.g., "Temperature – numeric box")
- Variable recommended by AI (e.g., "PLC_1.Temperature_Sensor_01")
- Match confidence (e.g., "Success")
- A checkbox (checked by default)
What do you need to do?
- Quickly scan: glance through the list to see if the AI's recommendations are reasonable.
- Uncheck unsuitable ones: If a recommendation is wrong, simply uncheck it.
- (Optional) Manual modification: If you want to bind a different variable, click the "Modify" button for that row to adjust.
Step 5: Apply with One Click
After reviewing, click the Apply button at the bottom of the window.
Once clicked, the AI will apply all checked bindings to your page components. Close the window and return to the canvas. Now:
- All components have been bound to variables
- You can immediately preview live data (if the device is online)
- The project can go directly into testing or delivery
From clicking "Smart Binding" to completion, the entire process takes less than 5 minutes.
Usage Tips and Best Practices
1. Variable Naming Conventions Are Foundational
No matter how strong the AI's matching capability is, it depends on a certain level of consistency in your variable naming. It is recommended to:
- Give variables meaningful names, like
Machine1_Temperatureinstead ofVar001. - Add more information in the variable description field. The AI reads these descriptions to assist matching.
Recommended naming convention:
Device Type_Device ID_Parameter Type_Parameter Number
Examples:
- Hydraulic_M1_Temperature_01
- Injection_M2_Pressure_Main
- Packaging_L1_Speed_Conveyor
2. Precisely Select Device Channels
When selecting channels, try to choose the smallest scope. For example, if the page only involves "Hydraulic Press – Main Unit 1", do not check the whole "Workshop A". This greatly improves matching accuracy.
Selection strategy:
| Page Type | Recommended Channel Scope | Matching Accuracy |
|---|---|---|
| Single device monitoring page | Select that device channel | 95%+ |
| Multiple devices of same type | Select the device group channel | 90%+ |
| Workshop comprehensive dashboard | Select the workshop channel | 85%+ |
| Plant‑wide large screen | Select multiple workshop channels | 80%+ |
3. Review Everything the First Time You Use It
Before you become familiar with the AI's matching logic, it is recommended to check every recommendation item by item during the first use. Once you build trust, you can confirm more quickly later.
4. Make Good Use of "Select All / Deselect All"
If the AI recommends 25 variables and you feel the first 20 are very accurate while only the last 5 need adjustment, you can quickly uncheck those 5 without re‑checking everything.
5. Use the Confidence Indicators
The AI provides a confidence level for each match (Success / Warning / Failure):
- Success: this can usually be adopted directly
- Warning: recommend a quick check
- Failure: recommend careful review or manual modification
6. Batch Process Similar Pages
If you have multiple similar device pages:
- Use Smart Binding on the first page, review carefully.
- Copy the first page for subsequent pages.
- Only modify the device channel scope.
- Rerun Smart Binding.
This ensures consistency while dramatically improving efficiency.
Typical Scenarios
Scenario 1: Urgent Bid, Customer Demands a Demo the Same Day
You receive an urgent request for a photovoltaic power plant monitoring project. After using AI Smart Binding, the variable binding work for 40 components, which would originally take 2 days, is done in 20 minutes. The same afternoon, you demonstrate a working demo with real data to the customer and successfully close the deal.
Time comparison:
- Traditional approach: page generation 30 min + manual binding 2 days = 2+ days
- AI approach: page generation 5 min + Intelligent Binding 20 min = 25 minutes
Scenario 2: Reuse Across Multiple Production Lines for Batch Efficiency
Your factory has 10 similar production lines. After the first line's monitoring page is generated and bound with AI, you copy the page to the other 9 lines, change only the device channel scope, and the AI automatically matches the variables for the corresponding lines. Development work for 10 lines is compressed from 2 weeks to 2 days.
Efficiency improvement:
- Traditional approach: 10 lines × 2 days = 20 days
- AI approach: first line 2 hours + other 9 lines × 1 hour = 11 hours
- Improvement: 95%
Scenario 3: Newcomer Training, Lowering the Onboarding Barrier
A new OT engineer joins the team and is not yet familiar with the variable table. With AI Smart Binding, he only needs to describe the page requirements clearly and select the correct device channels and the AI does 90% of the binding work. The learning time is significantly shortened.
Learning curve comparison:
- Traditional approach: familiarize with variable table 1 week + learn binding methods 3 days = 10 days
- AI approach: learn the AI tool 1 day + practice 1 day = 2 days
Scenario 4: Standardization in Large Projects
An automotive manufacturing project includes 50 workshops, each with 10–20 monitoring pages – 800+ pages in total. Using AI Smart Binding:
- Establish variable naming conventions.
- Define standard page templates.
- Generate pages in batches.
- Run Smart Binding in batches.
Project timeline:
- Traditional approach: 6 months
- AI approach: 1.5 months
- Improvement: 75%
Frequently Asked Questions (FAQ)
Q1: Could the AI bind the wrong variable and cause a production accident?
A: No. First, the AI's recommendations are just "suggestions". The final application decision is yours and you can review every item. Second, we strongly recommend testing in a non‑production environment before using it in live production. The AI is your assistant, not a replacement.
Safety assurance mechanisms:
- Review mechanism: all bindings require human confirmation.
- Test environment validation: recommended to validate in a test environment first.
- Confidence indicators: low‑confidence matches are specially marked.
- Rollback capability: supports undoing binding operations.
Q2: If my variable names are very non‑standard, can the AI still be used?
A: The AI will do its best to understand, but the effectiveness will be reduced. We recommend performing basic naming optimisation on core variables before using AI. This not only improves AI performance but also benefits your long‑term project maintenance.
Optimization suggestions:
- At least add meaningful descriptions to key variables.
- Use variable grouping to categorise by device/function.
- Gradually establish naming conventions and apply them to new variables.
Q3: Does Smart Binding support all types of components?
A: Currently, most common components are supported, such as text boxes, numeric displays, and buttons. We are continuously expanding support. If you have special component requirements, feedback is welcome.
Q4: What if the AI cannot find a suitable variable?
A: The AI will provide the following help:
- Recommend the closest alternative variable.
- Suggest new variables that might need to be created.
- Advise adjusting the channel scope and re‑matching.
- You can also manually select or create variables.
Q5: Does Smart Binding consume credits?
A: Yes. Smart Binding is part of the page generation functionality. Each binding operation consumes 20 credits. Compared to the hours saved over manual binding, this cost is very worthwhile.
Next Steps
- AI Script Assistant – After completing page component to variable binding, next learn about business logic, data processing, and system integration script development.
- AI Model Assistant – After the page data is connected, continue learning how to generate 3D equipment models to enhance page realism.
- AI Image Assistant – If the page still needs equipment main images, schematics, or enhanced on‑site photos, continue learning about image asset generation.